
Step 1 — Prepare the working folder
Create a dedicated folder, for example:
C:\Proyectos_APDL\M00Avoid working directly in Downloads, a temporary folder, or an unpermitted location. MAPDL will generate several files and all must be together to be able to reconstruct what happened.
Download
00_session_template.mac
and save it in that folder.
What is a file?
It is a text file with APDL instructions. Any text editor works; below we recommend Notepad++ with the course language (or VS Code as an alternative). You can version it and re-run it. The extension helps to recognize it, but the content is still text.
The script is the reproducible description of the analysis; the interface is one of the means to execute and observe it.
Recommended editor for APDL scripts
Not required to complete the module, but an editor with syntax highlighting facilitates read comments, blocks, and commands. Avoid Word or Notepad without highlighting - the script is plain text.
Notepad++ (recommended on Windows)
The course includes a language ready to import. Follow the
step-by-step guide to install Notepad++ and enable ANSYS highlighting APDL
or download directly
ansys-apdl-notepad++.udl.xml
.
Visual Studio Code (alternative)
Free and cross-platform editor, useful if you already use it or work outside of Windows. In the marketplace
there are several highlighting extensions for APDL; look for “ansys apdl” or “apdl syntax” in Extensions,
review the description and ratings, and install the one you prefer. Then open the .mac
downloaded and confirms that the language is correctly recognized.
Notepad++ UDL highlighting is basic (comments, structure, and some keywords); it does not replace the Command Reference. With either option you can start the course.
Step 2 — Open MAPDL from Product Launcher
Open ANSYS Product Launcher and go into the tab File Management. The essential fields are:
- Working Directory: folder from which MAPDL will read and write files to.
- Job Name: initial prefix of the job and of several generated files.
- Run: log in with that setting.
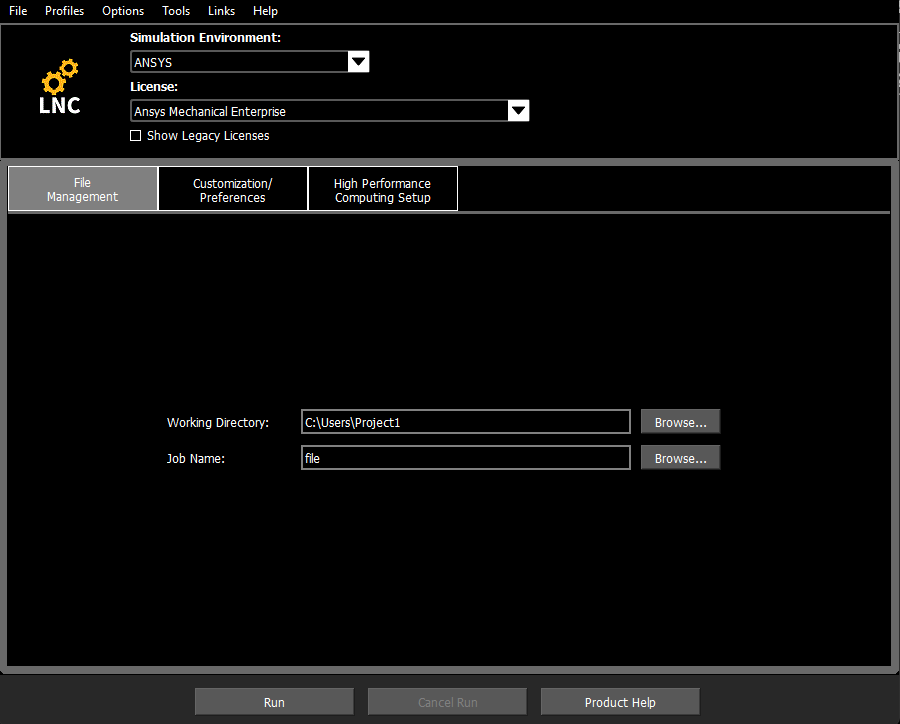
Job Name of the Launcher and /FILNAME
Product Launcher assigns the name with which the session is born. Template runs after
/FILNAME,m00_cantilever,1, so the main files of the exercise will use
m00_cantilever. Not a mistake: the script takes explicit control of your identity.